Dr Doom mask
Page 1 of 1

Dr Doom mask
![]() by Admin Tue Jan 03, 2017 10:07 am
by Admin Tue Jan 03, 2017 10:07 am
Some year, I want to make my own samurai armor. To do that, I have to work in mediums or materials I haven't before, and as such, I need to practice first so that, by time I get to the armor, it won't look like crap. One of the materials I need practice on is crafting foam.
I know, how hard can crafting foam be? It cuts like construction paper. It assembles like construction paper. Heck, all it is is a thicker version of paper (in my opinion), so what's the big deal? What I need practice in isn't with the cutting and gluing, but rather with the shaping of. You see, when exposed to a heat gun, the foam becomes very pliable, twisting and bending quite easily. When it cools, it retains that finished position. Being foam, it is still flexible, but it will keep that new shape.
Another thing I wanted to try out was some rubberized spray sealant. From the cosplay videos I've seen, a lot of people use Plasti-Dip. Flex Seal is very similar. The biggest difference I've read between the two is one sprays more evenly, but requires more coats (the dip); the other comes out thicker, but needs fewer coats (flex seal). Another spray I've read about is Rustoleum's... umm... the name escapes me at the moment, I'll edit it in later.
So, as a practice piece, I wanted to make something easy, something with basic shapes so I could see how well foam goes together, and with basic heat sculpting so I can get a feel for things. I settled on Dr Doom's mask, as things couldn't get any easier. It gave me a variety of sizes to work with, from small rivets to larger face panels, super glued either on the surface of the foam, or along the edge. Everything bonded together nicely and rather quickly; I can see why many cosplayers use this material! Very easy to work with, and somewhat forgiving. Heat sculpting was a pain up until I figured out the best technique for me: bend the piece into the shape I want and then apply heat. Prop or support it against something, aim the gun at the fold for a few seconds, remove gun, and wait for a few seconds more (until cool to the touch). Done. Heating the foam and then trying to bend it does work, but if you don't get the right shape right away, you'll have distortion.
Speaking of which: thinner foam will distort if the heat gun is too close or aimed too long. Ends may curl up. Flat surfaces may also develop some pitting. But, as this was a practice piece, one that I wanted to learn from, I was okay with that. This mask taught me a lot. Now then, enough talk... on with the pictures!
The first thing is the pattern. Okay, hold one moment... this was probably the second or third thing. I had to measure a bunch of parts of my face to make sure I had the dimensions right, but that goes without saying (even though I already did).
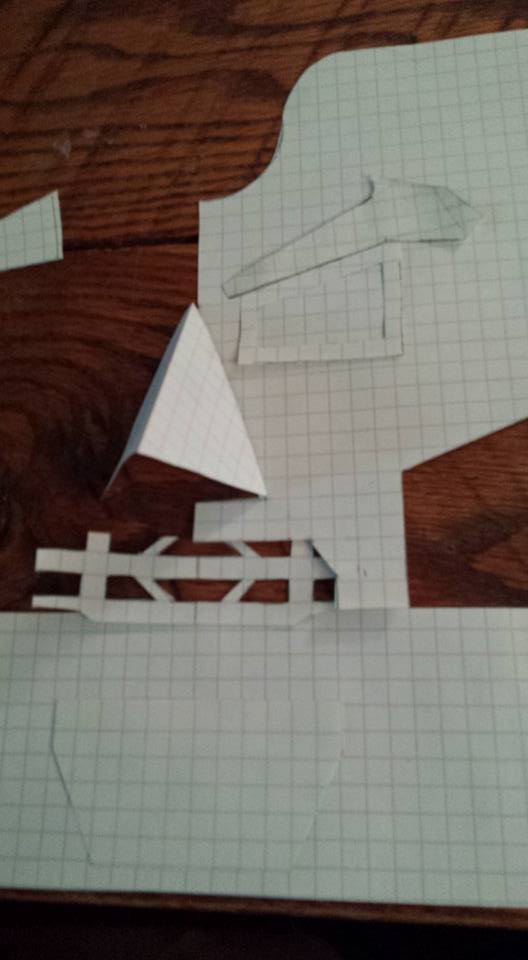
Next was to transfer everything to the foam. Here was lesson learned #1: I thought I needed to use a marker, didn't think a pencil would have been able to leave a lasting mark. Turns out using marker is messy, smears easily and gets all over your fingers. Making the scond side was easy, since all I had to do was flip the piece. Still didn't use pencil here. *shrugs* The ribbed portion on the cheek area is a bendy plastic hose cut in half.

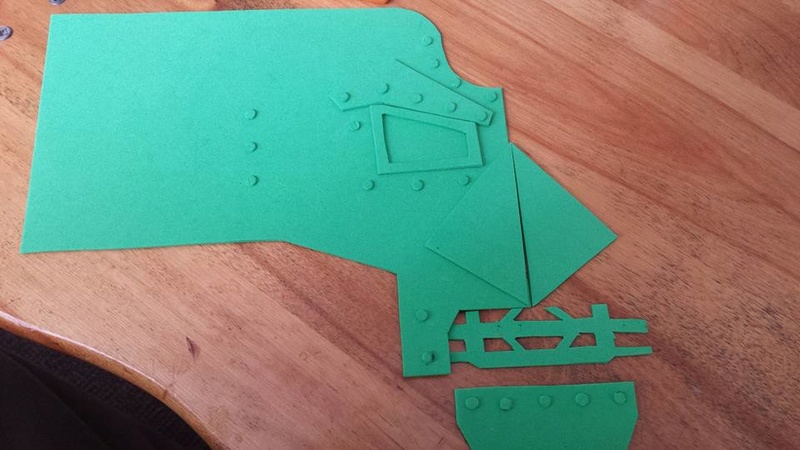
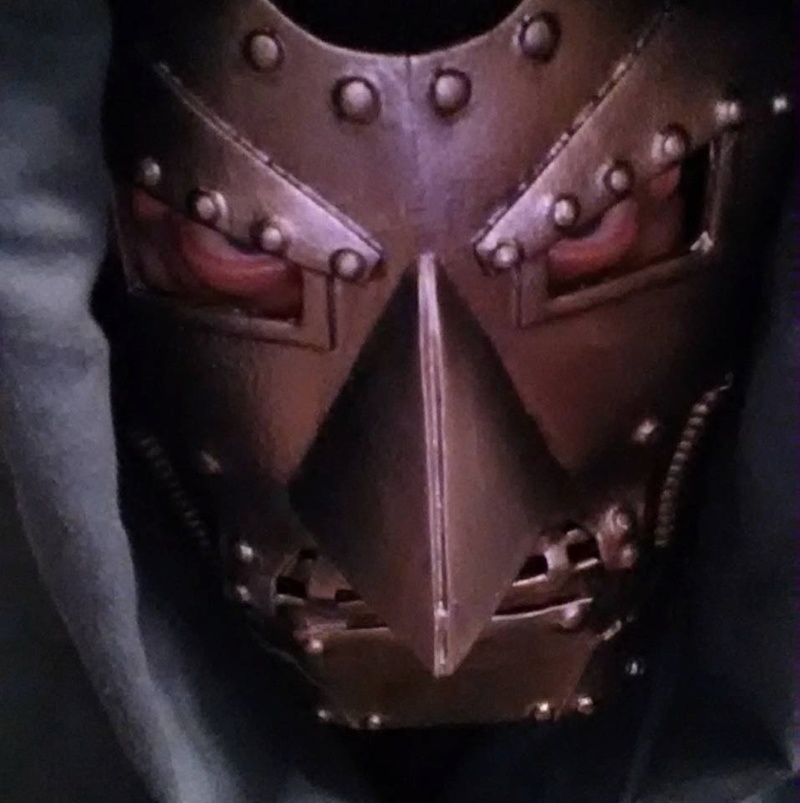
This is just a dry fit, after everything had dried (from the super glue). I attempted some heat sculpting here, along the back portion of the jaw ling and by the chin area. I wasn't too happy with the distortion of the mouth piece (you can see it on my left, and I kept reminding myself it's a first time for me. I also think I may have glued the nose on wrong, putting the bridge against the mask. But again, it's a practice piece, and that is easily fixed, right?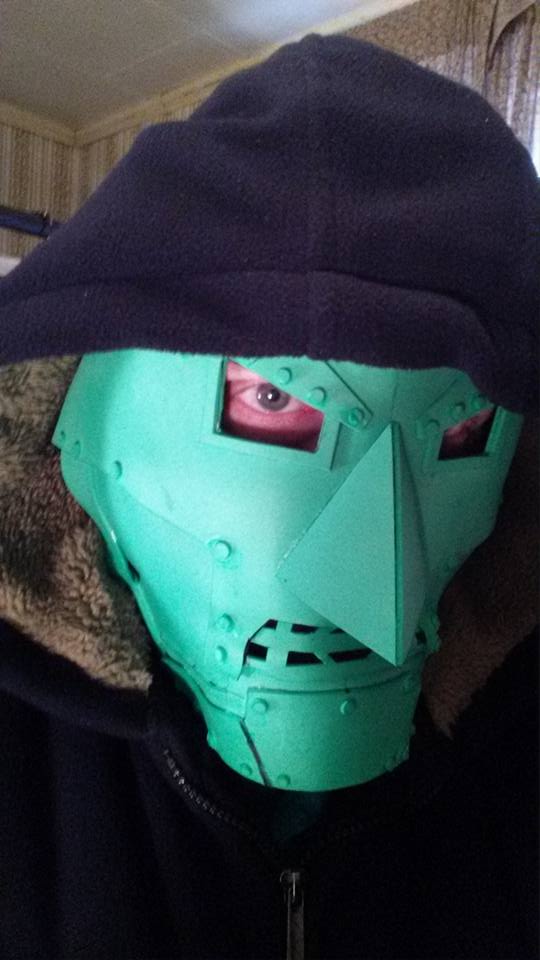
After more heat sculpting, I went ahead and coated it with the rubber sealant. You use the rubbery stuff so that it retains some of the flexing. If you were going for something more rigid, you could easily use mod podge or paint glue on it to make a nice seal. Here I learned that a PVC elbow is great as a stand, and it also doubles as an effective mold for heat sculpting. I did use two coats, but I think I may have gotten away with just one.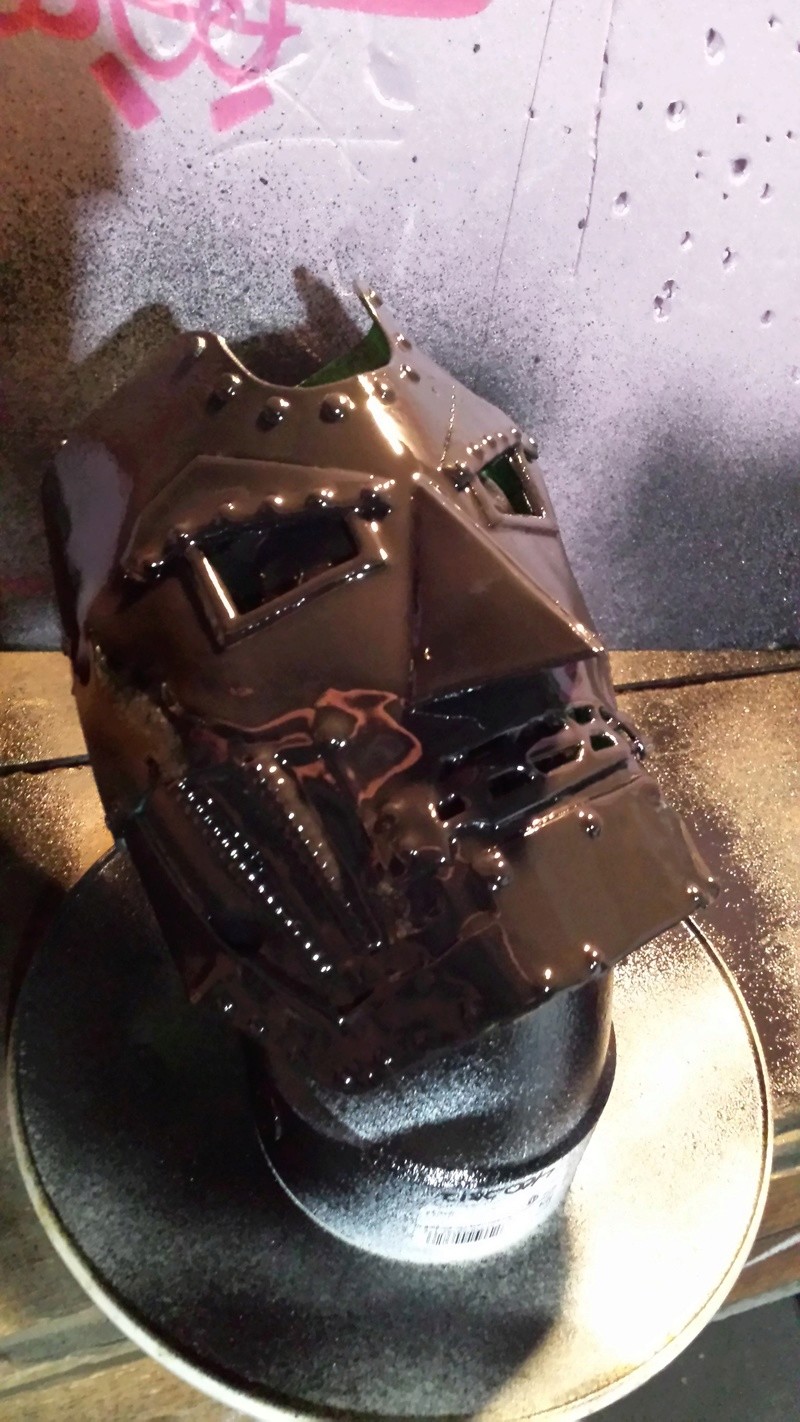
After drying, I applied a thin base coat of Gunmetal Gray, followed by some Sterling Silver for highlights. I didn't base coat the entire mask, as I wanted some of the black sealant to show through for shading or whatever. I attached some electrical tape to the mask to hold it on my head (will use elastic at some point). The black under the mask is a ski mask, the green cowl is a bed sheet. Just used those items to give it a more finished look, and in no way does it represent a final costume.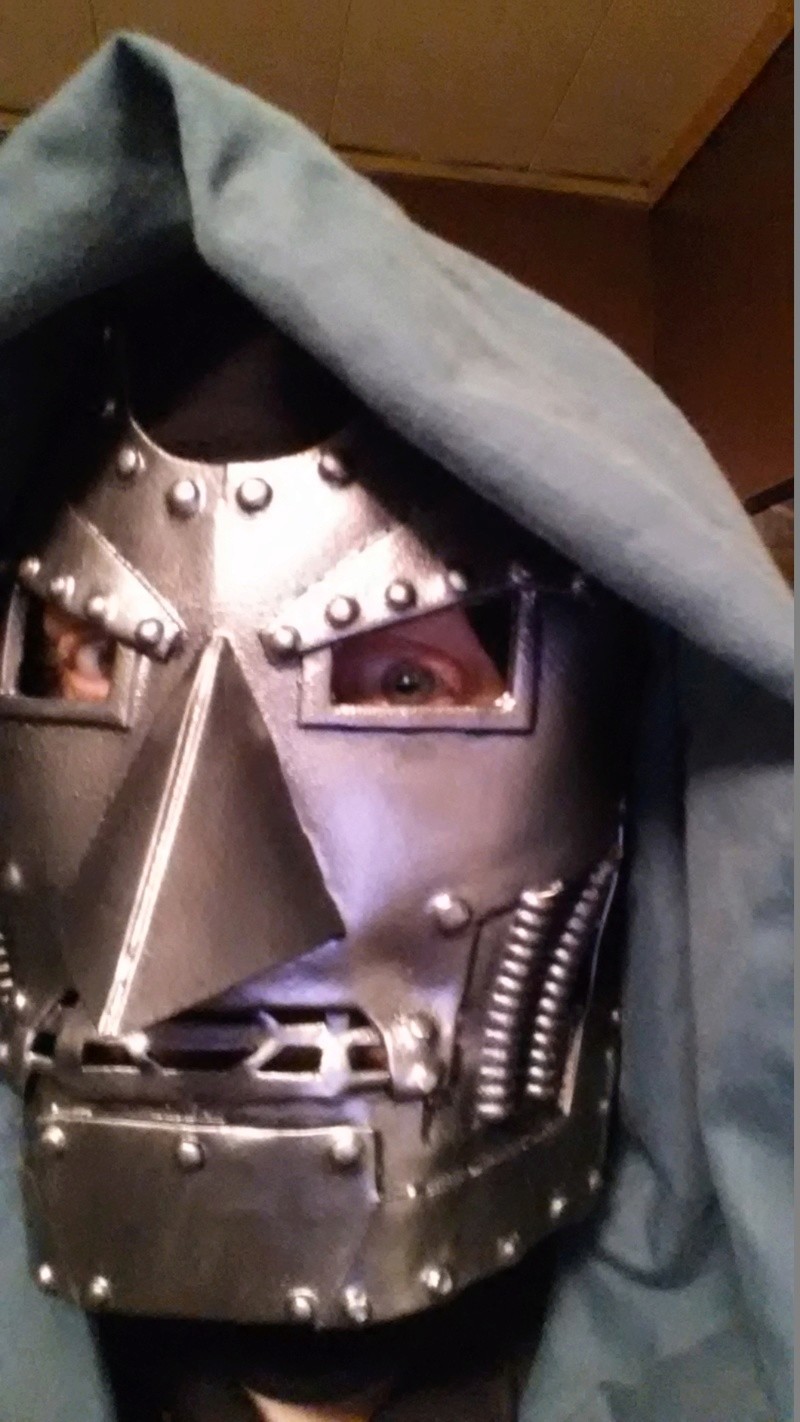
Things I could have done differently: made the jaw different, applied heat differently, and maybe make the chin pronounced, but I think that's just about it. As I mentioned earlier, the foam was great to work with. I may add some window screen to the back of the mouth guard, maybe some more detailing in the cheek area, but in truth I think this looks really good, not bad at all for a practice piece. I am happy with the way it looks... and I take satisfaction in knowing that future projects will only get better.

I know, how hard can crafting foam be? It cuts like construction paper. It assembles like construction paper. Heck, all it is is a thicker version of paper (in my opinion), so what's the big deal? What I need practice in isn't with the cutting and gluing, but rather with the shaping of. You see, when exposed to a heat gun, the foam becomes very pliable, twisting and bending quite easily. When it cools, it retains that finished position. Being foam, it is still flexible, but it will keep that new shape.
Another thing I wanted to try out was some rubberized spray sealant. From the cosplay videos I've seen, a lot of people use Plasti-Dip. Flex Seal is very similar. The biggest difference I've read between the two is one sprays more evenly, but requires more coats (the dip); the other comes out thicker, but needs fewer coats (flex seal). Another spray I've read about is Rustoleum's... umm... the name escapes me at the moment, I'll edit it in later.
So, as a practice piece, I wanted to make something easy, something with basic shapes so I could see how well foam goes together, and with basic heat sculpting so I can get a feel for things. I settled on Dr Doom's mask, as things couldn't get any easier. It gave me a variety of sizes to work with, from small rivets to larger face panels, super glued either on the surface of the foam, or along the edge. Everything bonded together nicely and rather quickly; I can see why many cosplayers use this material! Very easy to work with, and somewhat forgiving. Heat sculpting was a pain up until I figured out the best technique for me: bend the piece into the shape I want and then apply heat. Prop or support it against something, aim the gun at the fold for a few seconds, remove gun, and wait for a few seconds more (until cool to the touch). Done. Heating the foam and then trying to bend it does work, but if you don't get the right shape right away, you'll have distortion.
Speaking of which: thinner foam will distort if the heat gun is too close or aimed too long. Ends may curl up. Flat surfaces may also develop some pitting. But, as this was a practice piece, one that I wanted to learn from, I was okay with that. This mask taught me a lot. Now then, enough talk... on with the pictures!
The first thing is the pattern. Okay, hold one moment... this was probably the second or third thing. I had to measure a bunch of parts of my face to make sure I had the dimensions right, but that goes without saying (even though I already did).
Next was to transfer everything to the foam. Here was lesson learned #1: I thought I needed to use a marker, didn't think a pencil would have been able to leave a lasting mark. Turns out using marker is messy, smears easily and gets all over your fingers. Making the scond side was easy, since all I had to do was flip the piece. Still didn't use pencil here. *shrugs* The ribbed portion on the cheek area is a bendy plastic hose cut in half.
This is just a dry fit, after everything had dried (from the super glue). I attempted some heat sculpting here, along the back portion of the jaw ling and by the chin area. I wasn't too happy with the distortion of the mouth piece (you can see it on my left, and I kept reminding myself it's a first time for me. I also think I may have glued the nose on wrong, putting the bridge against the mask. But again, it's a practice piece, and that is easily fixed, right?
After more heat sculpting, I went ahead and coated it with the rubber sealant. You use the rubbery stuff so that it retains some of the flexing. If you were going for something more rigid, you could easily use mod podge or paint glue on it to make a nice seal. Here I learned that a PVC elbow is great as a stand, and it also doubles as an effective mold for heat sculpting. I did use two coats, but I think I may have gotten away with just one.
After drying, I applied a thin base coat of Gunmetal Gray, followed by some Sterling Silver for highlights. I didn't base coat the entire mask, as I wanted some of the black sealant to show through for shading or whatever. I attached some electrical tape to the mask to hold it on my head (will use elastic at some point). The black under the mask is a ski mask, the green cowl is a bed sheet. Just used those items to give it a more finished look, and in no way does it represent a final costume.
Things I could have done differently: made the jaw different, applied heat differently, and maybe make the chin pronounced, but I think that's just about it. As I mentioned earlier, the foam was great to work with. I may add some window screen to the back of the mouth guard, maybe some more detailing in the cheek area, but in truth I think this looks really good, not bad at all for a practice piece. I am happy with the way it looks... and I take satisfaction in knowing that future projects will only get better.
Admin- Admin
- Posts : 9
Join date : 2016-12-27 -

Page 1 of 1
Permissions in this forum:
You cannot reply to topics in this forum|
|
|